Showing posts with label Build Your Own Pochade Box. Show all posts

Wednesday, May 30, 2012

Serrett Box - Pochade Box by Fran Chuba


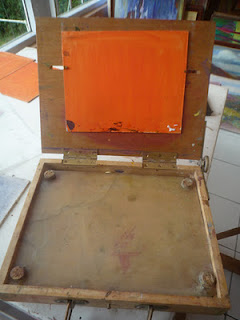
Fran Chuba is an artist from California USA, who sent me some amazing photos of her pochade box. She has some unique and well thought out customization's to the Serrett Box Design. What I really like is her simple method of carrying a wet panel in the lid, everything I've seen up to date has been too complicated or is just not functional. I have a converted cigar box which holds a wet sketch and have always liked that when done,  I just close the box and walk away with it. This design is truly is a kit for on the go painting.

"You'll also see in my photos that I made an additional wood palette that slips between the 2 "covers". This acts as an additional paint mixing surface, and as a divider when I close my easel, with the wet canvas board still stuck to the back wall of the easel lid, to protect the wet canvas board from the paint mixtures below. I'll flip the extra paint mixing surface over so the clean side will be against the wet canvas board (though it will not touch), and the wet side will be against the other paint mixing area."


The wet panel solution is beautifully simple and I think you will see many people mimic Frans design. She made four boxes to accommodate specific panel sizes.

"I made 4 Serrett Pochade boxes. (2-9x12 boxes; 1-10x13 box; 1-11x14 box) Because my plan is to use only 6x8 or 8x10 or 9x12 canvas boards, and because I have never had difficulty keeping them in place with large squares of  UHU tac removable Adhesive Putty,
 I did not make the cuts in the back panel and use a bungy cord."


She finished her kit with a closure clasp, a side brush holder and neutral plexiglass palette. This following image is of the complete box sitting on a mini tripod. Fran figured that her cost per box was a little over 20 USD each, but keep in mind she built four at a time. One has to admit, it is a pretty impressive looking DIY kit, very professional, probably why her art group has asked if she might build more.


"My entire goal was simplicity.
I kept asking myself how I could do it "lighter" and "simpler".
Having a Yarka, an EasyL Versa, and a French Half-box - yet still searching for something "lighter" and "simpler" has been interesting."


"I made this because I like to do 10-15 mile hikes around the streets of San Francisco, stop and paint. The Serrett Pochade Box will be lighter, more compact, more efficient than anything I have. And, yes, like most artists I have several wonderful easels, including a Yarka Plein Air Easel and an EasyL Versa Plein Air Easel, I think this Serrett Easel will be the best of all! Thanks for your generosity for posting your directions on the internet for all of us to enjoy and use."
Fran Chuba

You can see Frans work on her website.


My original intent was to design a kit anyone could build with simple tools and materials.
I never thought about how creative people would elaborate on and contribute to that idea; it has been a great experience for me. Thank you for sharing your creativity.


Explore - Question - Learn - Enjoy, Jim


You can find the original Serrett Box post and plans here.

Saturday, February 25, 2012

Pochade Box Plans 2.0

I wanted to post a couple of interesting Pochade kits by other artists.

Georgie Rey - Pochade Kit - Mauritius

Georgie Rey is an artist living in Mauritus, a island nation off the southeast coast of Africa in the Indian Ocean. Georgie not only built her kit but even had to have the bungee fabricated, I find her ingenuity and resourcefulness inspirational.


“I modified it a bit by making it deeper (for paints). I also added a removable perspex palette with corks stuck in the corners so that the wet palette doesn't touch the painting when I close the box. I use a light tripod. All this goes in my rucksack. I squeeze my paint out onto my palette before going so as not to carry heavy tubes of paint.”
Link to her Pochade Box post


“I like being outdoors in wild places, walking and looking! When I see an interesting place I like to paint there with my Pochade box and my oils doing paintings which come from my emotional reaction to the spirit of the place.”
--- Georgie Rey


Christopher Clark has produced a excellent artist box that has all the amenities, paint storage, hand palette and wet panel carrier. Christopher has created a video on the details of his Pochade Box as he takes it for its inaugural test drive and posted the plans for this kit on his site.
Take some time and look around his site; this is a energetic artist with many ideas.


“I love capturing the drama of an everyday moment that could have happened down the street from my house, or on the shore of a vast foreign continent. I try to make each one of my works a living memory to share with others. Pouring these stories into a single painting is both exhilarating and heartbreaking. But I guess that’s what happens when you open yourself up to the world.” – Christopher Clark


Scott Ruthven is a artist living in Colorado, USA. I had to post this kit even though the only resemblance to a Serrett Box is that there is a bungee in there somewhere. This is a beautifully crafted kit with some great little innovations. The wet panel carrier in the lid and mechanics of how the painting panel is removable are just great ideas. You can read about Scott's kit on his Blog here and watch the video here.

“Painting en plein air forces quick decisions and makes me paint instead of over-thinking everything.  When I decided to paint outside in earnest, I researched Pochade box options and decided I could make my own, custom box....a downside of having to be creative in every aspect of my life.  Although it took longer to make and cost more than I thought, I have a nice kit for oil painting outdoors.


Check out Scott’s video highlighting the functions of his Pochade Box.

“I have been amazed by the natural world my entire life.  As a teenager, I realized that I saw the world differently than most.  Sadly, many people live fast paced lives with blinders on that preclude them from really seeing the beauty all around.  I on the other hand, am constantly exploring and discovering.  I walk the back streets, hike deep into the wilderness, drive through old, forgotten towns....anything to connect with the authentic experience of life.  I truly believe life is about the journey, not the destination.”
---- Scott Ruthven


Keep those cards and letters coming!
Explore - Question - Learn - Enjoy, Jim


Thursday, June 30, 2011

Pochade Box Plans

How to make a Pochade Box - Serrett Box
It’s been a while since I posted any Pochade boxes, so I thought you might enjoy these stellar Serrett boxes by some very talented artists.

Mark Reeder, is a realist artist from Canada.
 "I am devoted to Realism, depicting the subjects I choose to paint as I see them in nature."


Although Mark states that he is mainly a portrait/figure painter his landscapes and still lifes certainly do not take a back seat. His pieces "Still life with Apples" and "Daffodils in the Studio" are top notch work. Well worth the visit to his blog, take some time and look through Mark Reeder's work and check out the Pochade box he made here. Some great photos and hints on how he made his kit.


 Josef  Sy, a artist also from Canada describes himself as, " Full time 3D animator / part time fine artist - instructor / full time Dad."

You'll find some interesting Classical portrait demos on his blog and a link to his web site for more work.

Josef built a fine looking Serrett Box, see more about his pochade and art work at this link  Josef's Corner.


Jeremy Sams  a North Carolina artist that voices his connection of faith and art.
"It is my goal as an artist to replicate the beauty of God's creation and capture the majesty of His handiwork through painting. He is the ultimate artist and it is my obligation and privilege to honor Him with my work."

He is a member of Charlotte Plein Air Painters and features the beautiful
Carolina country side in many of his plein airs. He made several innovations on the basic Serrett box, probably most interesting was the use of friction hinges. Jeremy provides several photos and instructions about his pochade here on his blog.


Ron Guthrie - This is the second time I posted a kit by Ron on this site, he built a
beautiful box over a year ago and more recently built another Serrett box for larger sized panels.

"The pochade box came out pretty cool. A lot bigger than the 9"x12" box but then again that box can't handle 11"x14" or 12"x16" panels. This bigger 12"x16" pochade can handle all of them from 12"x16 down. I could also do a vertical 16"x20" too although I've never attempted to do something that big plein air."


Ron Guthrie is a artist from Solvang California, is a member of The California Art Club, Oil Painters of America and involved with the Coast Guard Art Program. Ron's work is "clean", as I like to call it, others refer to it as honest, as of just speaking to the subject with the essentials, but I like clean, the very sincere efforts to express the image in front of him. He has a growing reputation, check out his work.


Again thanks to everyone who has been involved in the Serrett Box Pochade Box world take over. Your innovations, creativity and the generous sharing of your ideas will help open the doors of painting from life for artist everywhere.  Keep building and painting.

And with that let me say that the rumors of my demise have been greatly exaggerated.
So here is my Serrett Box on the trail at Kinkaid Lake.


A lot of life (good and bad) has gotten in the way of my posts here.


Explore - Question - Learn - Enjoy, Jim

Sunday, November 15, 2009

Pochade Boxes

I wanted to post updates from fellow artists who have built their own Pochade Boxes based on my Pochade Box Plans. It has been interesting to see their innovations and design ideas and correspond with so many creative people.


Artist - Judy Holder
Judy is an artist from Connecticut who has a very unique and personal style, you will certainly enjoy her use of brushwork and color, which flows through out her work. I particularly like her use of architectural features in her landscapes.
She reworked her box using some of the design ideas from my post, " How to build your own Pochade Box ".

"This is a pochade painting box I started building two years ago, and just recently finished after reading and viewing Jim Serrett's blog."


You can reach her page about her Pochade kit here.
You can learn more about the artist at her site, http://judyholder.blogspot.com/


Artist - Phong Nguyen

Phong is a talented artist from Columbus Ohio, from the highly acclaimed Columbus College of Art and Design working in multiple mediums. Illustration, design and fine arts.
Phong made some unique innovations to the box design adding a wet panel carrier into the top lid.


"I changed up a few things like making the box smaller and adding the wet panel carrier to the top."

"This thing is nice! So solid. Now I can see why people pay so much money for them."

"After using the box a few times, I think it might have been better to just make the panel carrier separately to keep the weight down, but with the box now, I have 1 less thing to carry."


I truly like the adjustable panel carrier inside of the kit, everything being self contained and one unit truly is streamlined and compact. Phong did have some problems with the t-nut mount holding, but I think we figured a piece of hard wood as the base plate would resolve that issue. The craftsmanship and the design ideas are impressive.


You can reach his page about his Pochade kit here.
And learn more about this artist at his site,
www.lemonlips.blogspot.com


Artist - Ron Guthrie

Ron is an artist from Solvang, California. Ron is a very accomplished plein air painter, who has a excellent blog with demonstrations, painting tips and some just stunning work. Be sure to check it out.
Ron has access to power equipment and that is reflected in the quality of his box, but agrees that this box can easily be built with simple hand tools. He also built a panel carrier.


"I've been wanting to build a pochade box much like the $300 models you can by without spending the $300. Jim Serrett had built such a box, the Serrett Pochade Box, using simple contstruction methods and scraps of wood keeping costs down and making building the box as simple as you can get."

"I don't think I paid more than $20 for all the material. I used an air powered brad nailer but you could do this with small finishing nails and a hammer. I have a table saw too but all of the wood can be cut with a hand saw. It's a great little box and can handle anything up to 9"x12" panels."


You can reach his page about his kit here.
You can learn more about this artist at his site. www.guthrieart.blogspot.com


Be certain to visit these artist's sites for more information on their personalized boxes.
My many thanks to everyone who has shared their efforts and artwork, you have made this a great experience for many.

Enjoy, Jim

Saturday, August 29, 2009

One Pochade Box

Since I first posted my “how to build your own Pochade Box” instructions back in February, I’ve had an amazing response from people all around the world. That post is being read in 48 countries and has been translated into 28 languages. There has been an array of correspondences with artist on every continent.

But these are the first images I’ve seen of a Pochade Box built from these plans.
This kit was built by Ruth Vines, a fine artist/graphic artist living in Florida, USA.
Ruth built a 10’ x 12” box with a Plexiglas palette.

Quote: "It was very easy to build, has more space than the small cigar box I have been using thus far (bought at ebay), and with the flatter mixing area I can finally do some knife painting. I put a piece of plexiglass in the mixing area, for easier cleanup."

Not only did Ruth do a beautiful job of making the Pochade kit, but she has already field tested it, producing some stunning work.
Check out Ruth’s work on her site.
http://www.krautart.blogspot.com/

Conquering the world, One Pochade Box at a time. Enjoy, Jim.

Friday, March 6, 2009

How to build a Pochade Box Panel Carrier


Winter 09, pochade painting, oil on canvas

This is the second installment on,” building your own Pochade Kit. The following instructions are for an easy to make Panel Carrier. Again, the idea was to use nothing but simple hand tools and easily accessible materials and also for this kit to be a cost effective way for anyone interested in working en plein air, to join in.
I think it should be said that on the market today there are some highly crafted and beautiful Pochade Kits available. The majority of which are worth every penny they charge for them.
Their cost has gone down considerably in the last few years, and I do see even cheaper models being offered, but I worry a bit about the quality of mass marketed and mass produced kits. I just hope when it comes time for me to upgrade to one of those high end set ups, they are still around. Just take a look at some of the off brand name French Easels in art supply stores.
Those knock offs have done more to damage the reputation of that easel than anything else.
So anyway, the whole point of this Pochade adventure is to give us an inexpensive avenue into working on location, in front of nature, and also to conserve expenditures for paying the bills and buying paint. Well at least until we get that huge commission or make a sale.
On to the kit.
I decided to build this box to hold 8’x10” (20x25cm) and 6”x8”(15x20cm) canvas panels or 1/8”
hardwood panels. I also wanted it to fit easily into my backpack with the box. I ended up with a panel carrier that is 9”x11” (23x27cm) finished size, which fits into almost any normal pack,
and holds seven panels total, or in my case six panels and a hand palette.

Material List:
Hardware latch and hinge $4.18
½ x 4” x 4” Pine board 2.20
¼ x 36” Hardwood dowels 3.70
1/4” x 2’ x 4’ Birch plywood 10.00
Total Cost: $20.08 USD

Tools List:
Miter saw and box
Hammer
Screwdriver
Sandpaper


You should have plenty of wire brads, wood glue, stain and polyurethane left over from the Pocahde Box.
I will say, if you build this box, go ahead and buy an extra three feet of four inch stock and build two of them at once. With the extra stock and the remaining supplies from the first, you will have enough materials to make two carriers for just a few more dollars and a little more effort. One of those hind site things. LOL

The sides of my box will be (10 1/4”) ten and one quarter inches long. This will give me room for the lid and the bottom panel, for a finished box size of eleven inches. Take a piece of two inch stock and cut it to (20 ½”) twenty and a half inches. Then attach your ¼” square dowels with glue and 5/8” wire brads. Use one of the dowel pieces as a spacer and stair step your way across the board until you get to the end and have something that looks like this.

Allow to dry over night. Then cut in a miter box, two lengths of 9 ¼” inches. Turn the two ends around so that the teeth match and mark with an X. This is the top of your panel sides. Check the width of your box with a canvas board.


Cut two panels from your Birch plywood, at nine (9”) by eleven (11) inches. Mark the top of the panels at one half inch (1/2”) for the lid and bottom one quarter inch (1/4”) for the base plate.
Line your side supports to those two lines and glue and nail together.


Next cut a piece of four inch stock to nine inches for your lid. Cut a piece from your plywood to (9”) nine by (3½”) three one half inches for your bottom plate. Nail and glue this piece on.
You now have a Pochade Box Panel Carrier !
All that’s left to do is sand and finish if you wish, and last, install the hardware.


Because I wanted my Panel Carrier to slide in and out of a backpack, I spent some time rounding the sharp edges with a wood rasp and sanding to ease the roughness. I also stained and polyurethane the outside of the box and used a piece of the scrap to make a small hand palette which fits inside the box. When I was done and looking at the left over material, I realized I could have built two carriers with just a few dollars more of stock material. Considering the most time spent was on gluing the dowels down, you can just as easily make two carriers by using a longer piece and cutting into fours. Of course if you had a source to route out the dados instead of gluing the teeth in place, you could make this carrier in no time. But if you have limited tools and equipment, this is a great solution for a fast, simple and easy to build Pochade Box Carrier. You will then have a functioning” Pochade Kit”,Pochade Box and Carrier for only $55.44 us dollars. Spend the savings on a tripod, paints, brushes and supports, or save up for one of those high end tricked out Pochade Kits.
Enjoy Jim

Tuesday, February 17, 2009

How to build your own Pochade Box

One of the things I’ve always enjoyed as an artist was the craftsmanship involved. If it’s either building my own stretchers, prepping canvas, customizing equipment for the studio, or just preparing panels for future work, it is great way to kill down time between painting projects. Sort of a Zen thing, doesn’t tax the brain but is productive in all ways for my efforts.

When it came to me that I would tackle building my own Pochade box, there was a precise set of criteria I needed to meet.
First it could not take hours of planning and measuring. Some boxes seem very complicated for what their function is. It needed to be a simple, functional design. I built this box in an afternoon, maybe four or five hours total. The panel carrier took a bit longer, but we will get into that later in this post.
Second it had to be done with fairly simple tools. Most importantly, it must be easily built without the use of a shop full of equipment. I’ve seen some wonderful “build your own Pochade Boxes” online. But most people do not have routers and table saws, or any method to cut dados into material. Just a set of hand tools, an average person would own and simple joinery. No complicated hardware to fabricate.

Third it had to be lightweight and easy to set up, which of course, is the entire point of a Pochade box. A few I’ve seen on the market have hefty bottom boxes that make the person using them look like an organ grinder without the monkey. But more importantly, the large base restricts your arm movement with the brush, so streamlined is the idea.

And finally, it had to be inexpensive to build. The material cost on this Pochade box was $22.09 US, and $20.08 for the Panel Carrier. Then another $13.27 for misc. items such as glue, stain and polyurethane. All for a grand total of $55.44 US dollars.

So you are probably thinking, let’s have a look at this fifty five dollar Pochade Box? Here she is in all her glory with her side kick, Panel Carrier. Which we will also build so that we have a complete en plain air kit. Ta-da!


Still interested?
If so, then read on and I’ll walk you through the projects with some photos and some simple explanations. Following is a materials list, tool suggestions and a photo to clarify some of these hardware pieces.

Materials: Estimated cost:
1 – 1/4” x 5/16” – Tee nut .98 per bag
2 - #10 washers .98 per bag
1 - #10 – 32 x 3/4” bolt with nut .30
1 - 1/2 inch by 4”x 4” wood stock…… I used a scarp of plywood.1.00 ?
1 - locking table leg brace 2.89
2 – 4” x 3/4” continuous hinges 7.00
1 - 1.75oz container #18 x 5/8” Wire Brads .98
1 – 2’ x 2’ 1/4“ luan plywood 3.40
3 - 36” x 1/2” x 3/4” Hardwood Square Dowels 4.56

Tool List:
Small hand saw
Miter box,… handy but not necessary.
Hammer
Philips head and standard driver
Drill, with a 3/16 inch wood bit
Sandpaper


Your first step is to decide on the size of your box. I wanted mine to hold panels as small as 5”x7” and as large as 9”x 12”. So the finish size was 14”x 11”, perfect for fitting in most backpacks. Once you have made this decision cut your 1/4” plywood to your finished size.
I used a normal handsaw, but you certainly can use a jig saw. Be warned, this stuff cuts like butter. In fact you can cut it with several passes of a utility knife. The Luan plywood is probably the main thing I would do differently on this box. Wherever you touch it with wood glue it saturates the wood fiber and does not allow a nice stain penetration, even after wiping off the excess glue. Pretty much acts as a resist. On the Panel Carrier I switched to Birch plywood, more expensive but worth the better finish. Also try to get the two panels as square as possible, the better they match up, the easier it will be to complete.
Next, measure 4 inches down from the top, on one of your two panels. Then measure in from the side 4-1/2 inches. You should have a vertical line on this panel reaching one third of the way in from each side. These will be your panel clip guides. Carefully cut both line as straight as you can with the saw, and sand smooth by doubling a piece of sandpaper in half and sliding it through the slots. If your cut line is a bit wiggly, sanding will help, but on location with a panel in place you’ll never notice if you wandered off the line.


Moving on to the box frame, what we are using is a stock commonly referred to as hardwood square dowels. Usually located where they sell finish grade lumber, they come in a variety of sizes. I had no problem locating this material. I used the 1/2” x 3/4” stock so I could have the bottom of the box deeper for paint and the top thinner. The construction is to simply cut your square stock to length and shadow box your panels using butt joints. Use the 1/2” on end for the bottom panel and flat on the 3/4” side for the top. See photo. Thinly coat both the panel and square dowel with wood glue and let them set a minute, tack together using the small wire brads.
Cut one piece to fit down the center of the Pochade Box top, in the wood space between your panel clip guides.


By now you should have something that’s starting to look like a Pochade Box, and it’s all down hill from here!
Now for attaching the base plate and the Tee Nut, I used a 1/2” scrap piece of plywood, but any stock material a half inch thick will do. (If you build the Panel Carrier at the same time, you can use the extra 4” stock.) If you already have a tri-pod, check the fit of the Tee Nut with it. The size listed here is standard for most, but it is best to be certain. Once you’ve got the right size, take your 1/2 x 4 x 4 stock and drill a hole in the center and drive the Tee-Nut in with a hammer. They usually sell this hardware in a bag of three so you can have a couple of try’s at it. Center base plate on the bottom box about an inch from the lip, glue and tack from the inside palette side with wire brads. Place some weight on top of this and let set for a day, you need a strong bond here.


At this point, with everything dry, I sanded and stained the box and hit it with a coat of fast dry polyurethane. How finished you want the box is up to you, you could go as far as setting the nail heads or just leave it raw wood. I thought the varnish wood help clean-up after use, and I’m glad I did.
As far as the hardware, the back hinges are simple enough to install. The placement of side brace requires a decision. I wanted my box to open as wide as possible, giving me lots of room to move a regular handle brush around without bumping the palette tray. But when closed the hinge brace sticks out about an inch from the box. You can move it in and flush with the edge of the box and still get a good angle. This was just a personal choice, you need to decide which will work best for you. When you mount the brace hinge use the washers in between the wood and metal so that it will slide and not bind the wood. I used a nut and bolt on the bottom and a wood screw in the top. Figuring the bolt side would take the most abuse and needed to be stronger.

Now for the panel clips and how panels are going to be held. It can’t get any simpler than this. I really thought about all the commercial boxes and the “build your own Pochade Box” sites that I’ve seen. The panel mounts were often too complicated or took too many specialized tools. A simple backpackers bungee and problem solved. I actually think it holds much better than some of the sliding mechanisms I’ve experienced. Plus it makes this a box that anyone can build and quickly enjoy the experience of painting on location - pretty much the goal of this whole effort.

.


So that is the box. Pretty simple and streamlined, it weighs in at just under one pound. And easily fits into my pack with the panel carrier. I made a small hand palette that fits into the carrier from the left over material. And other than the tri-pod spent just fifty five dollars on this entire kit. With the money I saved I can really stock up on paint, where I would rather spend my cash. Besides isn’t that what I am suppose to be doing, painting?
I hoped this was helpful, that you get some good ideas, or it even inspired you to build one yourself. If you do, I would love to see yours, I’ll post it if you’d like. Also, feel free to e-mail me with any questions, or post any comments, or if you share this info, just call it the “Serrett Box”.
In my next post I will be showing how the Panel Carrier goes together, so stay tuned.
Enjoy, Jim